tensorflow读取训练数据方法
预加载数据 Preloaded data
1 | # coding: utf-8 |
预加载数据方式是将训练数据直接内嵌到tf的图中,需要提前将数据加载到内存里,在数据量比较大,或者说在实际训练中,基本不可行。
声明占位符,运行时Feeding数据
1 | # coding: utf-8 |
声明占位符是在训练过程中Feeding填充数据,可以选择把所有数据一次性加载到内存,每次取一个batch的数据出来训练,也可以选择把数据通过python建立一个生成器,每次加载一个batch的数据出来训练,加载方式比较灵活但是效率相对比较低。
从文件直接读取数据
从文件读取数据的方式是在Graph图中定义好文件读取的方式,在Session会话中启动(一个或多个)线程,把训练数据异步加载到内存(样本)队列中(先加载到文件名队列中,tf自动读取到内存队列中),通过队列管理器进行管理,执行效率较高,工作流程示意图: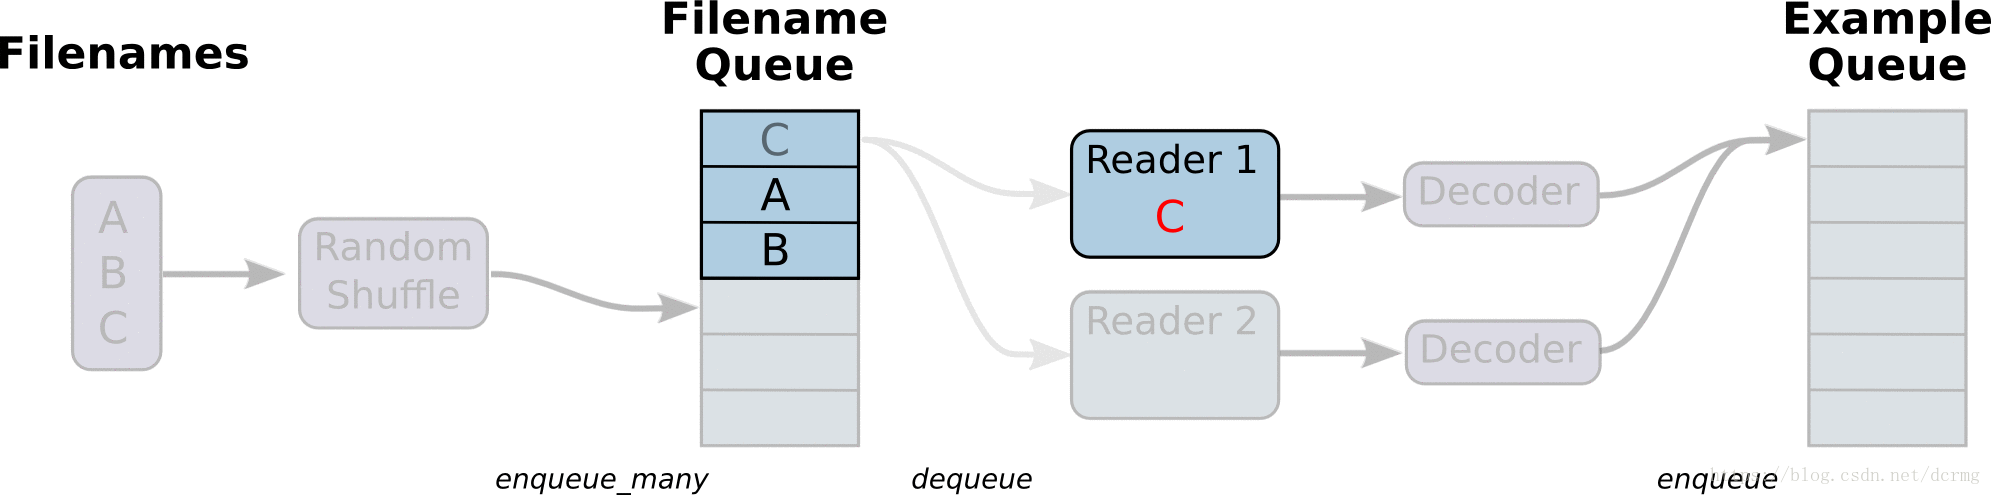
1
2
3
4
5
6
7
8
9
10
11
12
13
14
15
16
17
18
19
20
21
22
23
24
25
26
27
28
29
30
31
32
33
34
35
36
37
38
39
40
41
42
43
44
45
46
47
48
49
50
51
52
53
54
55
56
57
58
59
60
61
62
63
64
65
66
67
68
69
70
71
72
73
74
75
76# -*- coding:utf-8 -*-
import tensorflow as tf
import numpy as np
# 样本个数
sample_num = 5
# 设置迭代次数
epoch_num = 2
# 设置一个批次中包含样本个数
batch_size = 3
# 计算每一轮epoch中含有的batch个数
batch_total = int(sample_num / batch_size) + 1
# 生成4个数据和标签
def generate_data(sample_num=sample_num):
labels = np.asarray(range(0, sample_num))
images = np.random.random([sample_num, 224, 224, 3])
print('image size {},label size :{}'.format(images.shape, labels.shape))
return images, labels
def get_batch_data(batch_size=batch_size):
images, label = generate_data()
# 数据类型转换为tf.float32
images = tf.cast(images, tf.float32)
label = tf.cast(label, tf.int32)
# 从tensor列表中按顺序或随机抽取一个tensor准备放入文件名称队列
input_queue = tf.train.slice_input_producer([images, label], num_epochs=epoch_num, shuffle=False)
# 从文件名称队列中读取文件准备放入文件队列
image_batch, label_batch = tf.train.batch(input_queue, batch_size=batch_size, num_threads=2, capacity=64,
allow_smaller_final_batch=False)
return image_batch, label_batch
image_batch, label_batch = get_batch_data(batch_size=batch_size)
with tf.Session() as sess:
# 先执行初始化工作
sess.run(tf.global_variables_initializer())
sess.run(tf.local_variables_initializer())
# 开启一个协调器
coord = tf.train.Coordinator()
# 使用start_queue_runners 启动队列填充
threads = tf.train.start_queue_runners(sess, coord)
try:
while not coord.should_stop():
print '************'
# 获取每一个batch中batch_size个样本和标签
image_batch_v, label_batch_v = sess.run([image_batch, label_batch])
print(image_batch_v.shape, label_batch_v)
except tf.errors.OutOfRangeError: # 如果读取到文件队列末尾会抛出此异常
print("done! now lets kill all the threads……")
finally:
# 协调器coord发出所有线程终止信号
coord.request_stop()
print('all threads are asked to stop!')
coord.join(threads) # 把开启的线程加入主线程,等待threads结束
print('all threads are stopped!')
# output:
# image size (5, 224, 224, 3),label size :(5,)
# ************
# ((3, 224, 224, 3), array([0, 1, 2], dtype=int32))
# ************
# ((3, 224, 224, 3), array([3, 0, 4], dtype=int32))
# ************
# ((3, 224, 224, 3), array([1, 2, 3], dtype=int32))
# ************
# done! now lets kill all the threads……
# all threads are asked to stop!
# all threads are stopped!
与从文件直接读取训练数据对应的还有一种方式是先把数据写入TFRecords二进制文件,再从队列中读取。
TFRecords方式相比直接读取训练文件,效率更高,特别是在训练文件比较多的情况下,缺点是需要额外编码处理TFRecords,不够直观。
Tensorflow 动态图机制(Eager Execution)下的Dataset数据读取
Tensorflow动态图机制支持图上的运算动态执行,更方便网络模型搭建和程序调试,不再需要通过sess.run()才能执行所定义的运算,调试时可以直接查看变量的值,做到了“所见即所得”,动态图运算应该是未来tensorflow发展的方向。
动图模式下就必须使用Dataset API来读取数据。
tensorflow 1.3 版本中,Dataset API是在contrib包的,1.4以后版本中,Dataset 放到了data中:1
2tf.contrib.data.Dataset #1.3
tf.data.Dataset # 1.4
Dataset 读取数据示例:1
2
3
4
5
6
7
8
9
10
11
12
13
14
15
16
17
18
19
20# -*- coding:utf-8 -*-
import tensorflow as tf
import numpy as np
dataset = tf.contrib.data.Dataset.from_tensor_slices(np.array([0,1,2,3,4,5]))
iterator = dataset.make_one_shot_iterator()
one_element = iterator.get_next()
with tf.Session() as sess:
for i in range(5):
print(sess.run(one_element))
# output:
# 0
# 1
# 2
# 3
# 4
Dataset 读取训练图片文件示例:1
2
3
4
5
6
7
8
9
10
11
12
13
14
15
16
17
18
19# 将图片文件名列表中的图片文件读入,缩放到指定的size大小
def _parse_function(filename, label, size=[128,128]):
image_string = tf.read_file(filename)
image_decoded = tf.image.decode_image(image_string)
image_resized = tf.image.resize_images(image_decoded, size)
return image_resized, label
# 图片文件名列表
filenames = tf.constant(["/var/data/image1.jpg", "/var/data/image2.jpg", ...])
# 图片文件标签
labels = tf.constant([0, 37, ...])
# 建立一个数据集,它的每一个元素是文件列表的一个切片
dataset = tf.data.Dataset.from_tensor_slices((filenames, labels))
# 对数据集中的图片文件resize
dataset = dataset.map(_parse_function)
# 对数据集中的图片文件组成一个一个batch,并对数据集扩展10次,相当于可以训练10轮
dataset = dataset.shuffle(buffersize=1000).batch(32).repeat(10)
参考文献
TensorFlow 数据读取方法总结
读取数据(Reading data)
TensorFlow输入数据的方法有四种:
- tf.data API:可以很容易的构建一个复杂的输入通道(pipeline)(首选数据输入方式)(Eager模式必须使用该API来构建输入通道)
- Feeding:使用Python代码提供数据,然后将数据feeding到计算图中。
- QueueRunner:基于队列的输入通道(在计算图计算前从队列中读取数据)
- Preloaded data:用一个constant常量将数据集加载到计算图中(主要用于小数据集)
文章目录
读取数据(Reading data)
- tf.data API
- Feeding
- QueueRunner
3.1 Filenames, shuffling, and epoch limits
3.2 File formats
3.2.1 CSV file
3.2.2 Fixed length records
3.2.3 Standard TensorFlow format
3.3 Preprocessing
3.4 Batching
3.5 Creating threads to prefetch using QueueRunner objects
3.6 Filtering records or producing multiple examples per record
3.7 Sparse input data - Preloaded data
Multiple input pipelines
tf.data API
关于tf.data.Dataset的更详尽解释请看《programmer’s guide》。tf.data API能够从不同的输入或文件格式中读取、预处理数据,并且对数据应用一些变换(例如,batching、shuffling、mapping function over the dataset),tf.data API 是旧的 feeding、QueueRunner的升级。
参考文献
tensorflow之从文件中读取数据(适用场景:大规模数据集,亲测有效~)
提示 “Unzip trin-images-idx3-ubyte.gz”,因此考虑安装gzip
search target1:Download Gzip.dll for Windows 10, 8.1, 8, 7, Vista and XP
Gzip.dll download. The Gzip.dll file is a dynamic link library for Windows 10, 8.1, 8, 7, Vista and XP. You can fix “The file Gzip.dll is missing.” and “Gzip.dll not found.” errors by downloading and installing this file from our site.
Subprocess and Shell Commands in Python